
ℹ️ Info: If you want to test this project before deploying this yourself, contact me on X. I can't share details of the server because of AI and bots so they dont waste my VPS bandwidth.
Even if you dont trust the server, trusting the client code is the only thing you need thanks to the way this project is designed.
⚠️ Warning: Share access_code only with people you trust. Someone skilled could use the access_code for MITM!
-
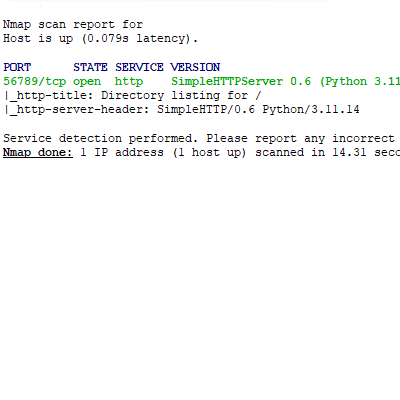
Server runs as Simple HTTP Server(shown in images below), so no network scan can suggest real intent (Chatting app). Some network analysers may flag this as C2 cause of the E2EE. Only the encrypted server public key is publicly available, so the server doesn't look that blank.
-
Every packet has following body (Encrypted by the server public key, which you obtained safely):
Unix timestamp(To make the packet expire after 5s, so replay attacks wont work)Client nickname_ID(not shared anywhere, unique, 16char long with letters (upper/lower) and numbers included)Client actionClient blob(Here the client sends the payloads)
-
How does the networking function?
- First you get the server public key which is encrypted using Fernet with the server access_code so no third-party could tamper with your future communication. If someone does tamper with data being sent, server will detect it and wont respond.
- After obtaining the server public key, you prove your integrity by decrypting the server public key by access_code entered on the client-side. You than use the public_key to encrypt every other request.
- The auth works by sending packet with
client action set to auth: {access_code}. Theclient_blob is set to your client public key, which is also encrypted using Fernet with the server access_code. Only with this packet, you use plaintext nickname, which the client wants to register. The server does checks whether the nickname is free or not. - After the server responds with client_generated_random_nickname_ID, the client loads room with
action: room_info. The unique 16 characters and numbers long nickname_ID is used to prevent session hijacks. - Client than either creates a new room using
action: room_createor joins a room usingaction: room_join. For both, you specify the room_specific password. The password is never sent to the server, that is why you can use this app even if you dont trust the server. Room_createis pretty straightforward, you get the server response which tells you if the room with your specified name was created successfully. You're now the room_leader, which will respond to new client, with the correct room_password, joining in.Room_joinworks bysending the room_leader your client_blob which now contains your new public_key encrypted with Fernet using the room_password.If room_leader decrypts the key, that means you have the same password and the room_leader sends you room specific pub and private key encrypted using your just sent public key. Otherwise, the room_leader sends the server notification about the wrong password. The server then notifies the guesser. Every nickname has only 3 guesses at all. If they join some room, the value resets, creating doesnt count. After 3 wrong guesses the nickname is blacklisted and logs will NOT be deleted.- If everyting went as it should, the client joins in and chatting can begin.
- If the room_leader quits the room, but the room is not empty, the room_leader role is passed down onto another client in the room.
- If the nickname went offline for a TTL_nickname var amount of seconds and hasn't used
client_action: QUIT, then the nickname is marked as free and all logs about it will be deleted after someone else reqeusts the certain nickname. - Code is equipped with MITM detection to warn you, if someting was tampered with.
⚠️ Warning: If client sees: 'Server-side error or possible MITM!', that means the client/server code or the payload was tampered with by third party.
/quit to leave the room and remove all logs about your nickname.
/details to get info about how many clients are connected in the room.
- Clients are represented by chosen nickname.
- Each IP can have
max_clients_for_ip+ 1 active nicknames (Default 10 nicknames). - Code is separated into multiple files for better modularity.
- fail2ban and docker integration is available.
- Once you authorize your ip, anyone can send as many requests as they'd like from your public ip. They cant cause any real damage, not even DDOS considering the bandwidth of the ONE IP rehind ONE ROUTER.
ℹ️ Info: By default, the project is set to http protocol meaning there is metadata leakage possibility. For those super paranoid: You can solve this by using Caddy.
⚠️ Warning: Make sure to rotate server access_code, which is used to C2S. Ensure length of this access_code to be enough to prevent offline brute forcing (Not a big deal for real time MITM, but if you use the same access_code over and over again, it may cause undetectable MITM for future communications). Every room ensures E2EE by creating yet another password which should be known only by those using that room (Stronly recommended using long password).
 |
 |
ℹ️ Info: Please ignore the IP addresses in the GIF below. It shows the program in a lab testing environment.


- Server is only for UNIX, client is for all platforms.
- If some IP addr. exceeds the ddos_protection var limit, then the program stores the IP addr. into
report.txtpermanently to your dir. Should be used with fail2ban. - Change port var to any port you'd like to avoid bots. If you plan to use Caddy, you'll need to change the Caddyfile port to your own.
⚠️ Warning: After using/quityour terminal might stop working as intended. If you encounter this type of error, useresetcommand (for Unix)
git clone https://github.com/Jak0ub/Cli_Chatter
cd Cli_Chatter
python3 -m venv venv
source venv/bin/activate
pip install -r req.txt
python3 client.py
report.txt will be now saved to your current dir as report_from_docker.txt. The file WILL be overwritten after restarting the docker.
Switch to root user
sudo su
Prepare working dir
mkdir /opt/chatter
cd /opt/chatter
touch report_from_docker.txt
chmod 666 report_from_docker.txt
docker compose pull
docker compose up -d
ℹ️ Info: You can also clone whole repo and compose docker using local changes.
- Do not share server password with everyone. Once someone has your password, they can send as many packets as they'd like.
- Server stores potential threats inside
report.txtorreport_from_docker.txt(docker version) to your current dir. - If you want to ban any IP inside this report, use fail2ban
Fail2ban setup for docker (Ban any IP after specified amount of packets until the server is rebooted)
Install fail2ban(Use your own package manager)
sudo apt install fail2ban
Edit conf file
sudo vi /etc/fail2ban/filter.d/cli_chatter.conf
Paste this inside vi session and use ESC + :wq + Enter
[Definition]
datepattern = ^
failregex = ^<HOST>\s+->\s+\d+x packets$
ignoreregex = ^Logged IP addresses|^If needed|^$
Now edit another config file
sudo vi /etc/fail2ban/jail.d/cli_chatter.local
Paste this inside vi session and use ESC + :wq + Enter
[cli_chatter]
enabled = true
filter  = cli_chatter
logpath = /opt/chatter/report_from_docker.txt
backend = polling
maxretry= 1
findtime= 1
bantime = 86400
action = iptables-multiport[name=CliChatter, chain=DOCKER-USER, port="1:65535", protocol=tcp]
Start the program
sudo systemctl start fail2ban
sudo systemctl enable fail2ban
- First I registered domain at Cloudflare. I also turned on the Cloudflare proxy.
- WHY? Because CloudFlare solves the
CF-Connecting-IPheader for me. I can fully rely on the integrity of this header. If someone does tamper with the hearer, Cloudflare drops the request. I do strongly recommend chosing Cloudflare, but do as you see fit yourself.
- WHY? Because CloudFlare solves the
- Then I bought a VPS.
- I installed the docker, edited the
docker-compose.ymland then I edited theserver.pyfile. DONT JUST COPY PASTE, READ IT THROUGH:
    #I defined this function in the class, because of how Caddy relays the requests
    def address_string(self):
        cf_ip = self.headers.get('CF-Connecting-IP') #CloudFlare ONLY
        if cf_ip:
            return cf_ip.strip()
        forwarded = self.headers.get('X-Forwarded-For') #Backup, dont rely on this
        if forwarded:
            return forwarded.split(',')[0].strip()
        return super().address_string()
    #And I changed these two lines in _GET and _POST:
    client_ip, client_port = self.client_address
    #To this:
    client_ip = self.address_string()
- I then created certificates to ensure https. I went to Cloudflare SSL/TLS > Origin Server and created certificates.
- After transfering the certificates and ensuring correct permissions to
/etc/caddy/cf-origin/ascert.pemandkey.pem, I edited the/etc/caddy/Caddyfileas following:
subdomain.domain.tld {
        tls /etc/caddy/cf-origin/cert.pem /etc/caddy/cf-origin/key.pem
        reverse_proxy localhost:9001
}
- Now i restarted caddy and booted up the docker container.
systemctl restart caddy
systemctl enable caddy
docker compose build --no-cache && docker compose up -d
- As for the Cloudflare solution, I enabled only Cloudflare origin IP using ufw so I can fully rely on the
CF-Connecting-IPheader. Source
for ip in $(curl -s https://www.cloudflare.com/ips-v4); do
  sudo ufw allow from $ip to any port 443 proto tcp
done
- Last step was integrating the fail2ban solution, and that's about it!
⚠️ Warning: Clients may need to disable IPv6.